TFT displays for Orange Pi Zero
Orange Pi Zero မှာ Raspberry Pi ကဲ့သို့ HDMI port မပါဝင်တဲ့အတွက် AV cable အသုံးပြုပြီး CRT (Cathode-Ray-Tube) TV တွေမှာ ချိတ်ဆက်အသုံးပြုကြပါတယ်။ GUI mode အသုံးပြုလို့ ကောင်းတဲ့ နောက်တစ်နည်းက TFT Display တစ်မျိုးမျိုးနဲ့ ချိတ်ဆက်ပြီး သုံးတဲ့နည်း ဖြစ်ပါတယ်။ SPI bus ပါဝင်တဲ့ TFT LCD များကို ရွေးချယ်အသုံးပြုနိုင်ပြီး၊ fbtft driver ထည့်သွင်းကာ အလွယ်တကူ ချိတ်ဆက်နိုင်ပါတယ်။ fbtft ဆိုတာကတော့ SPI bus အသုံးပြု ထိန်းချုပ်နိုင်တဲ့ small TFT display module အမျိုးမျိုးအတွက် Linux Framebuffer driver ဖြစ်ပါတယ်။ TFT display driver အတော်များများကို support ပေးထားပါတယ်။ ကိုယ့်ရဲ့ TFT LCD driver ကို supported list ထဲမှာ ပါ မပါ စစ်ဆေးချင်ရင် ဒီနေရာမှာ ရှာဖွေစစ်ဆေးလို့ ရပါတယ်။ သတိပြုရမယ့် အချက်ကတော့ fbtft_device module ကို Linux Kernel 5.4 ကနေ စပြီး Support မပေးတော့ပါဘူး (see fbtft wiki)။ ဒါကြောင့် Armbian Archive Storage မှာ Linux Kernel 5.4 ရဲ့ အောက် version တစ်ခုခုကို ရှာဖွေပြီး download ရယူထားနိုင်ပါတယ်။ ယခု Guide မှာ စမ်းသပ်ထားတဲ့ Debian Kernel version ကတော့ 3.4 ဖြစ်ပြီး ဒီနေရာမှာ တိုက်ရိုက် ဒေါင်းယူနိုင်ပါတယ်။ File size 203MB ရှိပါတယ်။ Download ရယူပြီးရင် Extract ပြုလုပ်ကာ balenaEtcher software အသုံးပြုပြီး SD card အတွင်းသို့ ထည့်သွင်းလိုက်ပါ။ kernel version စစ်ဆေးဖို့ကိုတော့ uname -r command နဲ့ စစ်ဆေးလို့ရပါတယ်။ Orange Pi Zero စတင် အသုံးပြုခြင်း Getting Started Guide ကိုတော့ ဒီနေရာမှာ အရင်ဖတ်ရှုနိုင်ပါတယ်။
4inch TFT Display | Driver: ILI9486
ဒီ TFT Display ကတော့ Waveshare က ထုတ်တဲ့ 4inch TFT Touch Shield ဖြစ်ပြီး၊ Arduino Uno or Mega နဲ့ compatible ဖြစ်အောင် ထုတ်ထားတဲ့ Shield ဖြစ်ပါတယ်။ LCD Controller Driver ကတော့ ILI9486 ဖြစ်ပါတယ်။ အောက်ပါ Table မှာ ပြထားတဲ့အတိုင်း TFT Shield ကို Orange Pi Zero နဲ့ ချိတ်ဆက်လိုက်ပါ။
| ILI9486 Pin Symbol | Orange Pi Zero Pin |
|---|---|
| GND | GND |
| 5V | 5V |
| LCD_BL | PWM1/PA06 |
| LCD_RST | UART2_TX/PA00 |
| MISO | SPI1_MISO/PA16 |
| MOSI | SPI1_MOSI/PA15 |
| SCLK | SPI1_CLK/PA14 |
| LCD_CS | SPI1_CS/PA13 |
| LCD_DC | UART2_CTS/PA03 |
ဒီ TFT Display Shield ကို အသုံးပြုရင် သတိပြုရမယ့် အချက်က - Shield ရဲ့ နောက်ဘက်မှာပါတဲ့ SPI config switch ၃ခုကို SCLK\D13, MISO\D12, MOSI\D11 ဘက်မှာ ထားရှိရမှာ ဖြစ်ပါတယ်။
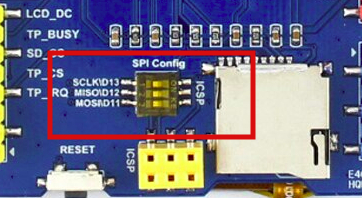
Figure: SPI Config Switch ၃ခုကို ICSP ဘက်သို့ မထားမိစေရန် သတိပြုပါ။
Orange Pi Zero မှာ SPI enable ဖြစ် မဖြစ် စစ်ဆေးရန် အောက်ပါ command အတိုင်း စစ်ဆေးပါ။
$ ls /dev/spi*
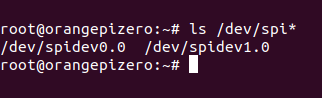
အကယ်၍ ls /dev/spi* command နဲ့ စစ်ဆေးကြည့်တဲ့အခါ SPI port များကို မမြင်ရဘူးဆိုရင် /boot/armbianEnv.txt ဖိုင်ထဲမှာ SPI parameter များကို ထည့်သွင်းပေးဖို့ လိုပါတယ်။ အောက်ပါ command နဲ့ armbianEnv.txt ဖိုင်ကို ဖွင့်ပါ။
sudo nano /boot/armbianEnv.txt
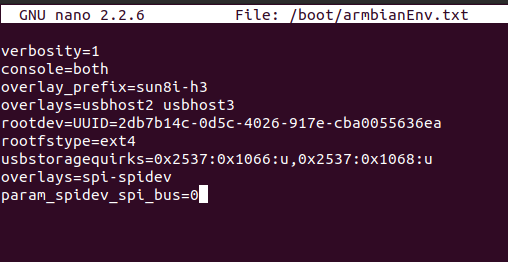
ပြီးနောက် အောက်ပါ SPI parameter ၂ကြောင်းကို အောက်ဆုံးတွင် ထည့်သွင်းကာ save ပြုလုပ်ပေးလိုက်ပြီး reboot လုပ်ပါ။
overlays=spi-spidev
param_spidev_spi_bus=0
အောက်ပါ modeprobe command ဖြင့် FBTFT device module ကို Linux Kernel သို့ ထည့်ပါ။ ( modeprobe command ကို loadable kernel module များ add or remove လုပ်ရန် အသုံးပြုပါတယ်။) အကယ်၍ LCD_DC, LCD_RST, LCD_BL pin တို့ကို table မှာ ပြထားတဲ့ နံပါတ်များအတိုင်း မတပ်ဘူးဆိုရင် command ရဲ့ gpios= အနောက်မှာလည်း ကိုယ်အသုံးပြုတဲ့ pin နံပါတ်များကို ပြောင်းလဲ ရေးသားပေးရပါမယ်။ rotate= parameter ရဲ့ အနောက်မှာလည်း 0, 90, 180, 270 စသဖြင့် တန်ဖိုးထည့်ကာ display ကို နှစ်သက်သလို rotate နိုင်ပါတယ်။
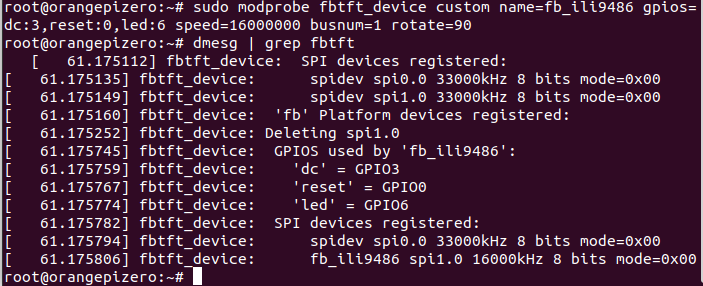
$ sudo modprobe fbtft_device custom name=fb_ili9486 gpios=dc:3,reset:0,led:6 speed=16000000 busnum=1 rotate=90
ပြီးနောက် Linux Kernel ထဲသို့ fbtft device driver ရောက် မရောက်ကို dmesg (diagnostic message) command အသုံးပြုကာ စစ်ဆေးနိုင်ပါတယ်။
$ dmesg | grep fbtft
ဒါဆိုရင် CLI console ကို framebuffer device တစ်ခုဖြစ်တဲ့ TFT Display Module ပေါ်မှာ ဖော်ပြလို့ ရပြီ ဖြစ်ပါတယ်။ CLI console ကို framebuffer device ပေါ်မှာ ဖော်ပြရန် con2fbmap command အသုံးပြုနိုင်ပါတယ်။
$ con2fbmap 1 8
အထက်ပါ command ရဲ့ ဒုတိယ argument ဖြစ်တဲ့ 8 က /dev/fb8 directory ကို ရည်ညွှန်းပါတယ်။ framebuffer device တွေဟာ hardware device တွေ ဖြစ်လို့၊ hardware device file တွေကို စုစည်းသိမ်းဆည်းပေးထားတဲ့ /dev directory အောက်မှာ fb ဆိုတဲ့ နာမည်နဲ့ တည်ရှိပါတယ်။ အောက်ပါ command နဲ့ /dev directory အောက်က fb device တွေကို စစ်ကြည့်လို့ ရပါတယ်။
$ ls /dev/fb*

Figure: framebuffer device list
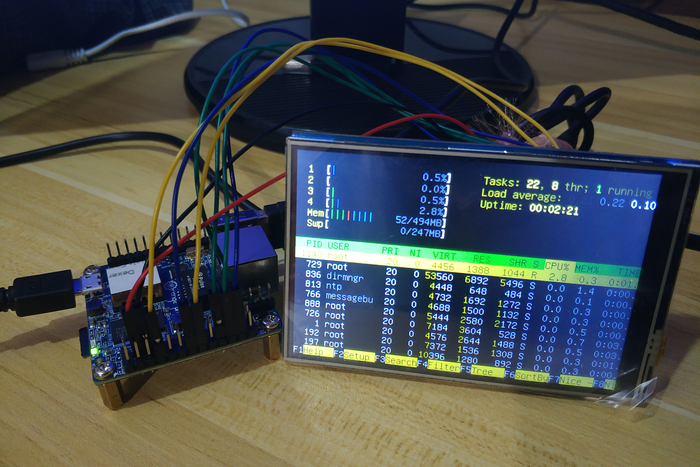
/dev/fb0 က first framebuffer device ဖြစ်ပါတယ်။ အကယ်၍ Raspberry Pi မှာ ဆိုရင် HDMI Display တပ်ဆင်ထားပါက $ con2fbmap 1 0 command ဟာ video driver ကို HDMI display ဆီသို့ output ထုတ်ရန် ခိုင်းစေခြင်း ဖြစ်ပါတယ်။ command မှာ ဒုတိယ argument ကို မထည့်ပဲ con2fbmap 1 လို့ပဲ ရိုက်ပါက first framebuffer device ကိုပဲ map ပြုလုပ်ပေးမှာ ဖြစ်ပါတယ်။ အောက်ပါ ပုံမှာတော့ system-monitor process-viewer command ဖြစ်တဲ့ htop ကို run ပြ ထားပါတယ်။ TFT display ပေါ်က console မှာ စာရိုက်နိုင်ဖို့အတွက် Orange Pi Zero ရဲ့ USB port မှာ Keyboard တိုက်ရိုက် တပ်ဆင်ထားဖို့တော့ လိုပါမယ်။
Figure: ili9486 TFT display running htop command
Permanent Setup for Console Mode
ဆက်လက်ပြီး CLI mode နဲ့ permanent boot တက်နိုင်ဖို့ setup လုပ်ပါမယ်။ အောက်ပါ command အတိုင်း new file တည်ဆောက်ပါ။
$ sudo nano /etc/modules-load.d/fbtft.conf
အောက်ပါ content ကို ရေးထည့်ပြီး save ပါ။
fbtft_device
နောက်ထပ် new file တစ်ခု ထပ်တည်ဆောက်ပါမယ်။
$ sudo nano /etc/modprobe.d/fbtft.conf
fbtft_device အတွက် အောက်ပါ configuration ကို ထည့်ပြီး save ပါ။
options fbtft_device custom name=fb_ili9486 gpios=dc:3,reset:0,led:6 speed=16000000 busnum=1 rotate=90
နောက်ဆုံးတစ်ခု အနေနဲ့ /boot/armbianEnv.txt file ကို ဖွင့်ပါ။
$ sudo nano /boot/armbianEnv.txt
armbianEnv.txt ဖိုင်ရဲ့ အောက်ဆုံးမှာ အောက်ပါ argument ကို ထည့်ပါ။
extraargs="fbcon=map:8"
အားလုံးပြီးရင် reboot ချလို့ရပါပြီ။
Console Mode မဟုတ်ပဲ Desktop GUI အသွင်အပြင်နဲ့ အသုံးပြုချင်တယ်ဆိုရင်တော့ X.org Server, Light Display Manager, XFCE Desktop Environment နဲ့ icon theme တွေ ထည့်ဖို့ လိုအပ်ပါမယ်။ အောက်ပါ command အတိုင်း install လုပ်လိုက်ပါ။
$ sudo apt-get install xorg lightdm xfce4 tango-icon-theme gnome-icon-theme
ပြီးနောက် အောက်ပါအတိုင်း startx command အသုံးပြုပြီး X session ကို initialize လုပ်လို့ ရပါပြီ။
$ FRAMEBUFFER=/dev/fb8 startx

Figure: ili9486 TFT display running debian xfce desktop
Permanent Setup for XFCE Desktop
XFCE Desktop အသွင်အပြင် ကို Permanent boot setup အတွက် အောက်ပါဖိုင်ကို တည်ဆောက်ပါ။
$ sudo nano /etc/modprobe.d/fbtft.conf
fbtft.conf ဖိုင်အတွင်းသို့ အောက်ပါ configuration ကို ထည့်ပါ။
options fbtft_device custom name=fb_ili9486 gpios=dc:3,reset:0,led:6 speed=16000000 busnum=1 rotate=90
ဆက်လက်ပြီး အောက်ပါ ဖိုင်ကို တည်ဆောက်ပါ။
$ sudo nano /etc/modules-load.d/fbtft.conf
အောက်ပါ content ကို ရေးထည့်ပြီး save ပါ။
fbtft_device
နောက်ဆုံးအနေနဲ့ အောက်ပါဖိုင်ကို တည်ဆောက်ပါ။
$ sudo nano /usr/share/X11/xorg.conf.d/99-fbdev.conf
အောက်ပါ setting ကို ရေးထည့်ပြီး save ပါ။
Section "Device"
  Identifier "myfb"
  Driver "fbdev"
  Option "fbdev" "/dev/fb8"
EndSection
အားလုံးပြီးလို့ reboot ချလိုက်ရင် Permanent အဖြစ် XFCE Desktop GUI တက်ပါပြီ။
2.8inch TFT Display | Driver: ILI9341
နောက်ထပ် စမ်းသပ်ထားတဲ့ TFT display ကတော့ 2.8inch, driver: ili9341 ဖြစ်ပါတယ်။ ချိတ်ဆက်ပုံကတော့ အောက်ပါ table အတိုင်းဖြစ်ပြီး ကျန်လုပ်ငန်းစဉ်များနဲ့ သိသင့်တာတွေကတော့ ili9486 TFT မှာ ဖော်ပြခဲ့တာတွေနဲ့ အတူတူပါပဲ။
| ILI9341 Pin Symbol | Orange Pi Zero Pin |
|---|---|
| GND | GND |
| VCC | 5V |
| LED | PWM1/PA06 |
| RESET | UART2_TX/PA00 |
| SDO(MISO) | SPI1_MISO/PA16 |
| SDI(MOSI) | SPI1_MOSI/PA15 |
| SCK | SPI1_CLK/PA14 |
| CS | SPI1_CS/PA13 |
| DC | UART2_CTS/PA03 |
အောက်ပါ command ဖြင့် FBTFT device module ကို Linux Kernel သို့ ထည့်ပါ။
$ sudo modprobe fbtft_device custom name=fb_ili9341 gpios=dc:3,reset:0,led:6 speed=16000000 busnum=1 rotate=90
ပြီးနောက် အောက်ပါ command ဖြင့် XFCE Desktop GUI ကို ဖော်ပြနိုင်ပါပြီ။
$ FRAMEBUFFER=/dev/fb8 startx
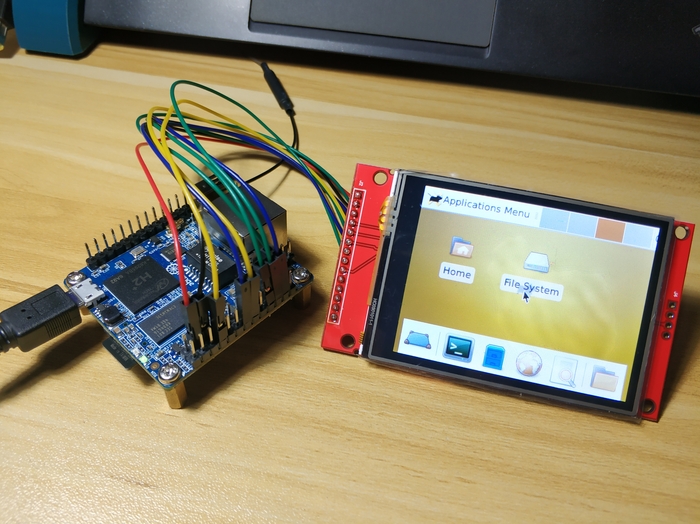
Figure: ili9341 TFT display running debian xfce desktop
CLI mode ဖြင့် ဖော်ပြလိုရင်တော့ $ con2fbmap 1 8 command အသုံးပြုလိုက်ရုံပါပဲ။ Permanent Setup များအတွက်ကတော့ ili9486 မှာ ဖော်ပြခဲ့တဲ့အတိုင်းပါပဲ။ Permanent Setup Configuration setting များမှာ သက်ဆိုင်ရာ ကိုယ့်ရဲ့ TFT Driver နံပါတ်များ ပြောင်းလဲ ရေးသားပေးဖို့တော့ လိုပါမယ်။
2.2inch TFT Display | Driver: BD663474
ဒီ BD663474 TFT display ကတော့ waveshare ကထုတ်တဲ့ 2.2inch 320x240 Touch LCD (A) အမျိုးအစား ဖြစ်ပါတယ်။ သူ့ကို waveshare website မှာ ဖော်ပြထားတာကတော့ 3.3V power supply နဲ့ အလုပ်လုပ်တယ် ဆိုပေမယ့် စမ်းသပ်ကြည့်တဲ့အခါ 5V နဲ့မှ ကောင်းစွာ အလုပ်လုပ်တာ တွေ့ရပါတယ်။ ဒီ TFT Display ကို အသုံးပြုခဲ့တယ်ဆိုရင်တော့ display မပျက်စီးအောင် အရင်ဆုံး 3.3V နဲ့ စမ်းသပ်ကြည့်စေလိုပါတယ်။ အောက်ပါအတိုင်း ချိတ်ဆက်နိုင်ပါတယ်။
| BD663474 Pin No. | Symbol | Orange Pi Zero Pin |
|---|---|---|
| 1 or 2 | GND | GND |
| 3 or 4 | 3.3V | 3.3V |
| 5 or 6 | PWM | PWM1/PA06 |
| 31 or 32 | RESET | UART2_TX/PA00 |
| 33 | MISO | SPI1_MOSI/PA15 |
| 35 | SCK | SPI1_CLK/PA14 |
| 37 or 38 | CS | SPI1_CS/PA13 |
| 39 or 40 | RS or DC | UART2_CTS/PA03 |
အောက်ပါ command ဖြင့် FBTFT device module ကို Linux Kernel သို့ ထည့်ပါ။
$ sudo modprobe fbtft_device custom name=fb_bd663474 gpios=dc:3,reset:0,led:6 speed=16000000 busnum=1 rotate=270
အထက်မှာ ဖော်ပြခဲ့ပြီးတဲ့ Guide အတိုင်း ဆက်လက် စမ်းသပ်ကြည့်ပါ။
$ FRAMEBUFFER=/dev/fb8 startx

Figure: BD 663474 TFT display running debian xfce desktop
1.5inch RGB OLED Display | Driver: SSD1351
OLED Display လည်း အဆင်သင့်ရှိနေတဲ့အတွက် Orange Pi Zero နဲ့ အတူ တစ်ခါတည်း စမ်းသပ်ကြည့်ထားပါတယ်။ SSD1351 OLED Display Module နဲ့ စမ်းသပ်လိုတယ်ဆိုရင် အောက်ပါအတိုင်း လုပ်ဆောင်ပါ။
| SSD1351 Pin Symbol | Orange Pi Zero Pin |
|---|---|
| GND | GND |
| VCC | 5V |
| RST | UART2_TX/PA00 |
| DIN | SPI1_MOSI/PA15 |
| CLK | SPI1_CLK/PA14 |
| CS | SPI1_CS/PA13 |
| DC | UART2_CTS/PA03 |
အောက်ပါ command ဖြင့် FBTFT device module ကို Linux Kernel သို့ ထည့်ပါ။
$ sudo modprobe fbtft_device custom name=fb_ssd1351 gpios=dc:3,reset:0 speed=16000000 busnum=1 rotate=0
အထက်မှာ ဖော်ပြခဲ့ပြီးတဲ့ Guide အတိုင်း ဆက်လက် စမ်းသပ်ကြည့်ပါ။
$ con2fbmap 1 8
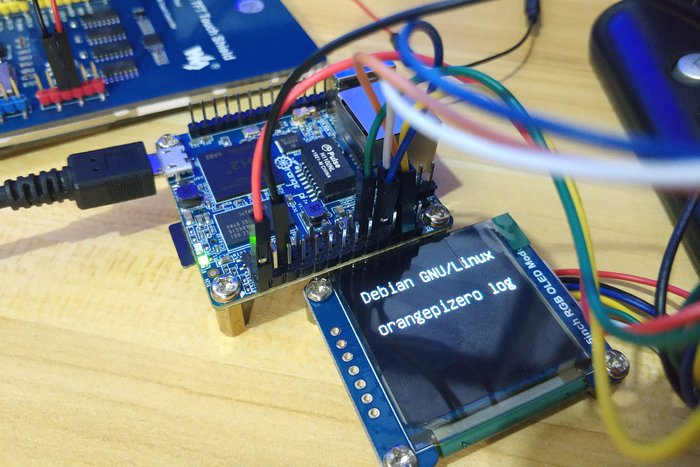
Figure: SSD1351 OLED display running Debian CLI mode